Developer Journal
As of the 3rd of April, I’ve learned how to use Structs within Unreal to create a proper colour-coded key system with doors.
I’ll be using structs as a more accessible way to edit multiple types of data for an actor in my project.
“A struct is a collection of different types of data that are related and held together for easy access.”
unrealengine.com, 2021
This is important as the collectable keys have more than one variable – A single key will contain; an image, text and colour.
How it works in the game is that I’ve currently got a key system where certain colour-coded keys open doors with matching colours, I’ve also made models for each of these actors as seen in Figure 1.
Each key also has a unique material and light assigned to it from the struct.
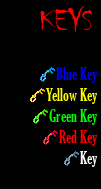
Not only that, but I’ve also got a widget list that keeps track of all the current keys the player has collected throughout the level on the top right of the screen in Figure 2.
So how was I able to do this? I created a structure blueprint for the data I wanted to store within the keys and doors, this contained variables for a 2D Texture, a text variable and a linear colour (Figure 3).

For the keys and doors, a variable of this data structure is stored in both of them.
This will be used to help detect whether the variable of the key the player is using on the door matches the exact key data variable the door contains. Figure 4 shows a struct variable in one of the actors of Key Data containing the values we’d entered earlier.

The keys will have to be collected by the player, so the Player has an array type of the Key Data variable (Figure 5).

Back to the key actor, there is a component overlap that casts to the Player and calls a custom event for storing the key in the array. Here, we get the key variable from our current key that is being collected to insert into the player’s inventory (Figure 6).
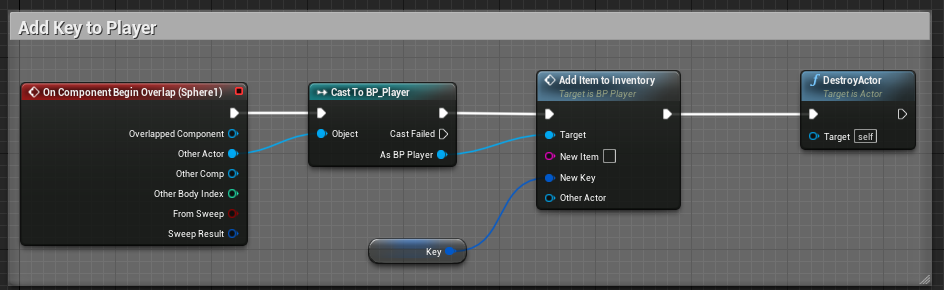
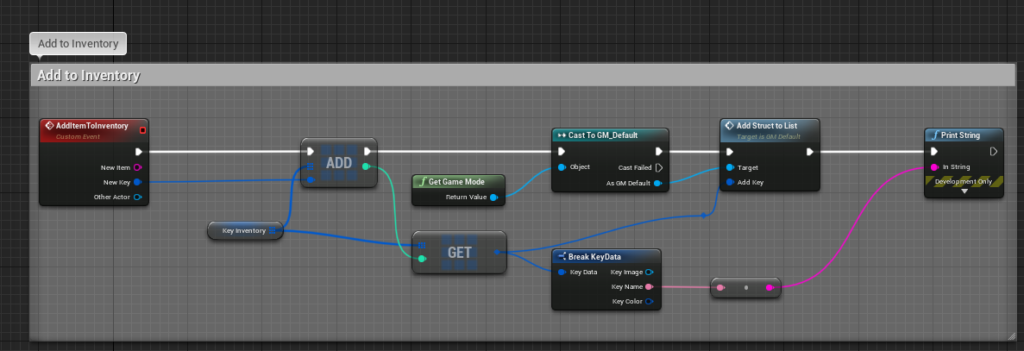
Using a custom event, we can now use the New Key to add it to the player’s inventory array. Included is also a casting towards our game mode blueprint – this will come in later once get to the widgets (Figure 7)
Now for our door actor, we have a begin overlap event that casts to the player’s inventory and checks to see if it contains a matching key – this is a structure whose variables completely match our collected key’s.
If the player does contain a matching key, then the door will be opened (Figure 8).

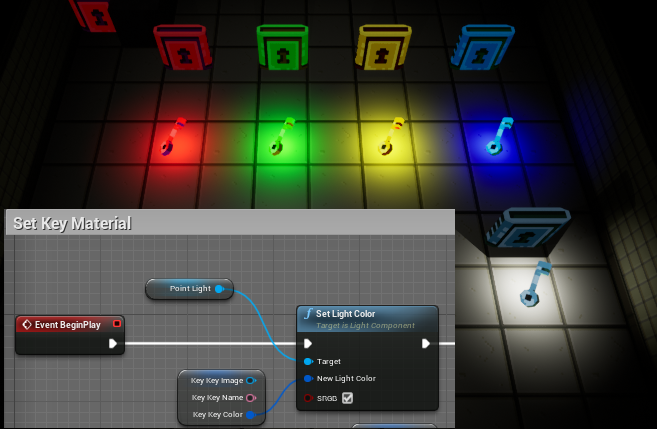
To also help differentiate different keys and doors between each other, an event BeginPlay will check to see a key or door’s Key Data variable and change their material based on if the text matches the Literal Text.
For example, if the struct contains a text variable called “Red Key”, then that exactly equals to the Literal Text named “Red Key” as well. If this is true then set the material of the key or door to red.
If it’s false then move onto another section where it will be compared to a different text, if the text doesn’t match any then it will turn the door into a Neutral colour (Figure 9).

Keys will also set the colour of their light to the colour variable in the struct as well, Figure 10 shows what the doors and keys look like in-game.
As for the Widgets, I want the keys to display on the player’s interface so that they know what current key they’re holding – this can be useful to help the player keep track of all the keys they’ve stored.
I created an object blueprint that would store variables from Key Data to then be used later to display on the Widget (Figure 11).

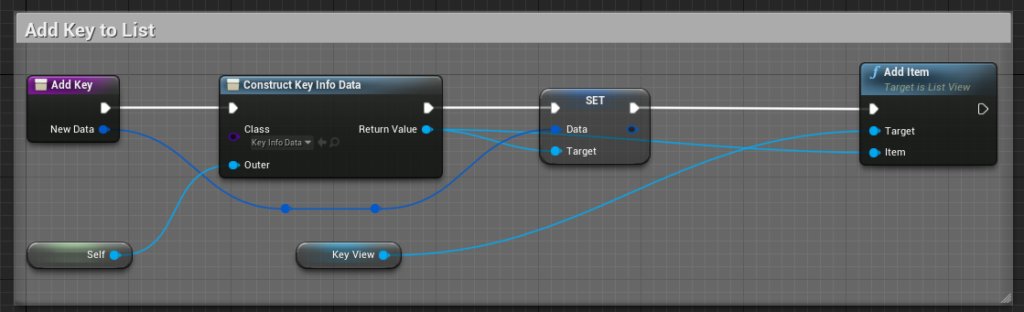
I’d made a ListView widget containing where these collectables will be stored, using a custom function called Add Key.
There you can see that there is an input for New Data, this is adds the data received to the list (Figure 12).
Although before we start adding to our list, we need a separate Widget which will be how we want each individual line to display on our list.
In Figure 13, I’ve binded the text, color and image of an object to this particular line I want to enter.

To make this compatible with the ListView widget, I implemented a UserObjectListEntry interface.
This helps get our object supplied by the Add Item method earlier, this is then casted to the KeyInfoData and is stored as a variable (Figure 14).

Now all we do is just bind our list’s widget entry class to widget we’d just created and it will display the entries on the list like so (Figure 15).

In our game mode blueprint, we create the list when the game starts, we also promote the return value of the widget into a variable to be referenced later (Figure 16).

Using a custom function within our game mode blueprint, we can add any entry widget to the list by taking the Key Data and using it as the function’s input.
Also included is a Key Array within the game mode to add the following keys to the array (Figure 17).

As from earlier, our cast to the game mode from picked up keys enable them to be displayed in the list like this.
As some of their functions are binded to the data struct’s variables they display the images and colours correctly to the picked up key’s (See Figure 18).
This was one of the more challenging tasks of working on my game, but I am glad I managed to learn and figure out how to get Data Structures working within Unreal.
This was important to the game as to make it more readable to the player by displaying the data of their collectables to the User Interface, although not completely necessary I still feel as if it can go a long way to help make the game more accessible.
However, I think some parts can be improved a bit better such as how changing the object’s material could use a simpler and more efficient function rather than using a lot of branches.
Bibliography
Docs.unrealengine.com. (2021) Struct Variables in Blueprints. [online] Available at: https://docs.unrealengine.com/en-US/ProgrammingAndScripting/Blueprints/UserGuide/Variables/Structs/index.html [Accessed 9 May 2021].