Categories
Uncategorised

Developer Diary : Maze

Development Activity

For this week, we’ve been working on a maze game that’d randomly generate a maze each time the player opened up the game. I learnt to try and implement textures from a tile sheet of my own as well as trying to generate my own simple structures into the maze.

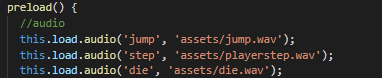
First task I tried to do was implementing my own textures into the game, this required me to add two extra pngs to the assets folder of the game; “tilesDecoration” for randomized decorations, “tilesStructure” for the tiles of the structures that’ll be appearing throughout the game (See Figure 1).

Figure 1

How this works is that I’ve used a constant variable to define each tileset asset and gave them each a different ID, having these set as constant variables means that they cannot be altered by the program during regular execution – this is important as we will be reusing most of these values during our code.

Constants are useful for defining values that are used many times within a function or program. … By using constants, programmers can modify multiple instances of a value at one time.

Techterms, 2013

Once the constants are created, we then create another variable which will act as a layer within the game.

As shown in the bottom half of Figure 2, you can see the first three lines of code using our constant variables for every specific layer included with a unique ID for each. Afterwards the maze will then generate these tiles into the game.

Figure 2

Before we generate our tiles onto a path, we need to specify which tiles are needed to spawn and to place them in a random order. This is done within our MazeTiles.js file.

As shown in Figure 3, we have declared static variables for how we’d want the order of these tiles to be generated. For the main tilesheet, the variables are; “GetFloorTile”, “GetWallTile”, “GetHomeTile”, “GetDiasTile” and “GetWinTile”.

The first three will pick a random tile between a specific point, such as “GetFloorTile” choosing the first 16 random tiles to arrange onto a layout. Other variables such as “GetWallTile” and “GetHomeTile” will start off on a specific number as indicated by the number after the “return” function at the start and then add on the random number to choose between.

For our other tilesheets, we would have to use “GetDetailTile” as we have a different arrangement on tiles on these sheets, all of which being a selection of 4 tiles (See Figure 3).

Figure 3

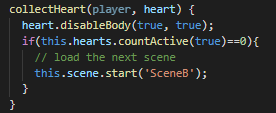
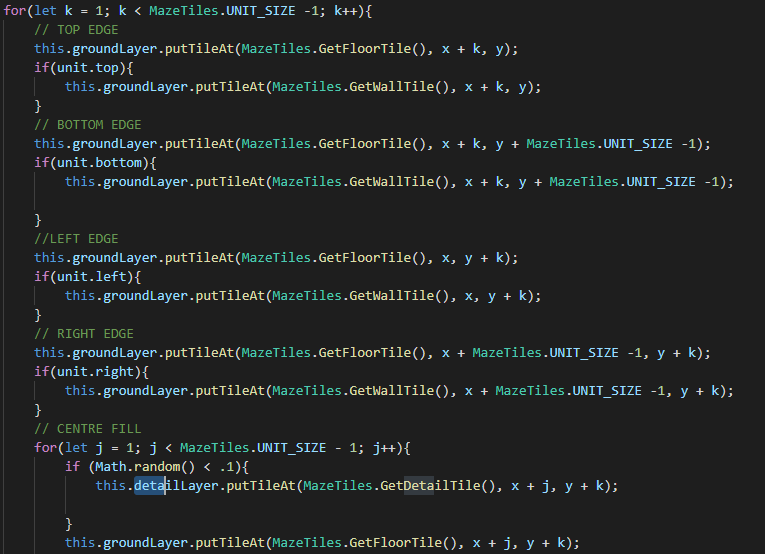
As shown here in Figure 4, this is how our tiles will be arranged in the game. This code here generates our tiles onto a certain position within a unit (This is each area within our maze), it will generate some floor tiles on the area first, and then some wall tiles on the edges of the unit – these typically have been assigned the “groundLayer” variable.

Near the bottom, you can also notice the “detailLayer” variable being used for the centre fill, this fills the centre of each unit. However, our detailLayer has been assigned a random chance of spawning each tile by 10% chance (0.1 out of 1).

This makes details appear much less often and makes each room feel more unique and different from eachother.

Figure 4

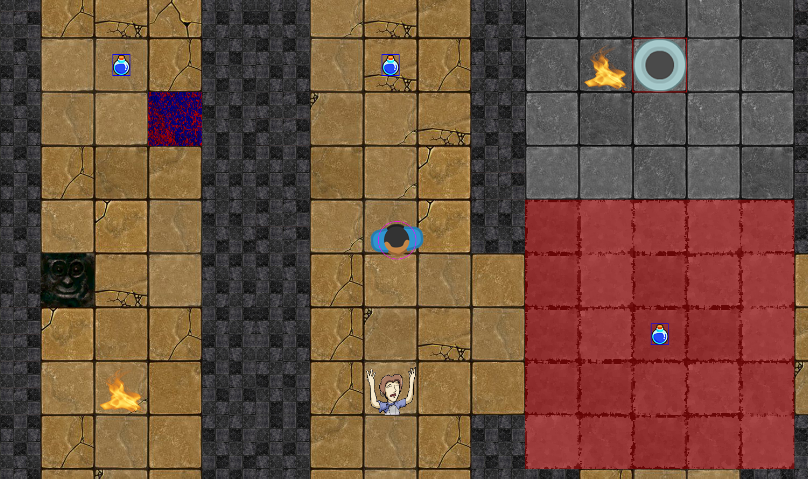
As shown in Figure 5, this is what all of our tile arrangements look like within the game. You can see our walls and floors being arranged on most of the main units with some sprinkles of tiles from our “detailLayer”.

On the bottom right of the image is the custom unit I’ve created, which uses unique tiles from the “structureLayer”.

Figure 5

Unit layouts in the code are generated by detecting a place within the game space, and spawning some tiles within that designated area.

As Shown in Figure 6, the starting room for instance, looks for the middle of every layout by dividing the room’s height and width in half and placing the tiles directly in this spot.

Figure 6

For my own custom unit, I decided to go with a room that would be generated within a random place in the level.

To do this, I declared some variables at the start of the code which would be assigned a random number multiplied by the level’s height and width to give it some some accurate coordinates to be placed within as shown by Figure 7.

Figure 7

To get the position of the room, this line of code here is assigned the variables and inserts them as the room’s coordinates as seen in Figure 8.

Figure 8

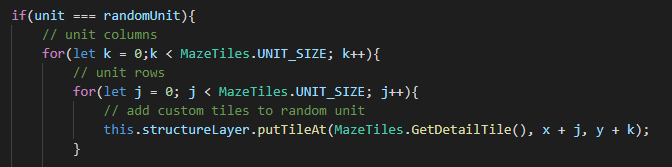
The code here in Figure 9 shows that if one of the units positions within the level is equal to that of our randomUnit, then it will spawn the room here as well as assigning it a unique tileset compared to our other unit.

Figure 9

As shown by Figure 10 & 11, the room spawns in completely random places within the level – sometimes directly next to the middle of the level or either the far edges of it.

Figure 10
Figure 11

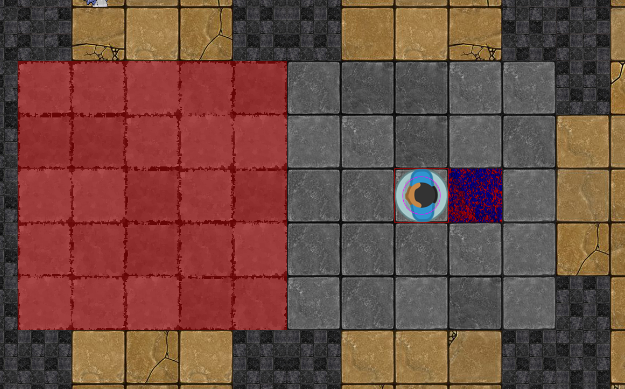
One particular issue that arises from this however is that there is a random chance that this will spawn on top of our player spawn.

I consider this project to be mostly a success, as I was able to implement most of what I had planned as well as tweaking them slightly to make improvements.

One problem I’d struggled with before was trying to implement multiple tilesets into the scene as I had tried to use a single variable before, however using multiple constant variables to assign new tileset images with unique IDs had worked out for me.

This meant that any new tileset I’d add into the assets folder would be given a fresh ID to help the code distinguish it from the others – I feel as if I have gotten a slightly better grasp on the concept of using constant variables from this.

Bibliography

Docs.microsoft.com. 2018. Const Statement – Visual Basic. [online] Available at: <https://docs.microsoft.com/en-us/dotnet/visual-basic/language-reference/statements/const-statement> [Accessed 26 January 2021].

Techterms.com. 2013. Constant Definition. [online] Available at: <https://techterms.com/definition/constant> [Accessed 26 January 2021].

Categories
Uncategorised

Developer Diary : Tank Game

Development Activity

For this week, we worked on a tank game during Tuesday in class using Phaser. Included in the project, we were also tasked to add on at least two customizations for the game as well.

The two addition I have decided to add to the game was a UI element that displayed the player’s current health, and some health pickups that dropped by random chance from defeated enemies (See Figure 1).

Figure 1

To add the text, I created a variable called ‘healthDisplay’ and assigned some text to it.

This text would subtract the player’s current ‘damageCount’ and ‘damageMax’ which would then display the amount of hitpoint’s the player has (See Figure 2)

Figure 2

Another important thing I added was to set the depth of the UI display to a high number, this is so that the UI can be drawn above most of the objects in the scene – this prevents anything from obscuring it such as enemies and projectiles.

The depth is also known as the ‘z-index’ in some environments, and allows you to change the rendering order of Game Objects, without actually moving their position in the display list.

The default depth is zero. A Game Object with a higher depth value will always render in front of one with a lower value.

Phaser 3 API Documentation, 2021

User interfaces are known to be specially important within games as they can display vital information to the player such as health, ammo or any general hud element that player has to keep track of.

This is typically why user interfaces are always on front, as obscuring them may prove to be unfair and frustrate the player from keeping track.

I’ve also made sure that the health user interface updates within the player’s bullet collision function as shown in Figure 3.

Figure 3

This is fairly simple as it is similar to our other line from before, however instead of adding text we are just setting the text in our variable to update the player’s health by setting it to their current damage variables.

The Player’s ‘damageMax’ is set to 20, this means the max amount of damage they can take is 20 hit points, when they take a hit their ‘damageCount’ goes up by one.

Figure 4

As shown by Figure 4, this is the player’s health as normal when unaffected. So the sum in the text we set is essentially 20 subtracted by 0, which displays full health.

For the pickups, I used a new javascript file and added a pickup class that I’ll be extending.

Figure 5

What Figure 5 is essentially showing is that any variable that appears from the ‘PickupHealth’ class from this file will inherit the following functions.

Amount, which is the number of health given back.

An enabled physics body as to make sure collisions can work with each object inheriting from the class.

For the pickups, I plan for them to randomly drop from defeated enemies, Which is where the variables for them will come in.

Figure 6

As shown in Figure 6 within the main scene’s code, I added a new variable called ‘randNumber’, what this does is that it currently has a number set to 0 at the start of the code.

However each time an enemy tank is defeated, within their ‘IsImmobilizeed’ function the ‘randNumber’ variable is called upon and is changed into a random number from 0 to 4 using the ‘Math.Floor’ and ‘Math.random’ features.

If the variable’s number matches the if statement’s conditions, then a new variable is created within the function using our recently created ‘PickupHealth’ class.

Figure 7

Once the player collides with the pickip, the function calls for ‘burgerHitPlayer’. This function essentially takes away one point of the player’s damage count using the pickup’s ‘amount’/

It is also noted that the text of the user interface from earlier is updated too.

Figure 8

Figure 8 shows a before and after of the player picking up health, the top image shows the pickup’s being spawned into the level via enemy drops.

Once the player collides with these, they disappear and the player’s health interface increases.

Although this is most of what I’d done this week, if I were to of had more time to expand upon this game then I would include possibly more pickup types with different functions for the player to experiment with.

However I am pleased with how far I managed to get and feel as if I have a better understanding of how to implement features such as these.

The bit I enjoyed doing the most was trying to make it so my pickups and health interface worked together, this was because it was quite satisfying to implement two features that both came hand in hand – picking up health would directly involve the user interface to change and to keep track of the player’s hit points.

One of the hardest parts for me to figure out was trying to make it so the pickup drops would be randomly dropped from enemies, the issue was that I wanted to implement the random chance as its own function rather than including it in an already existing function – as this was hard to figure out due to many issues trying to get its values to carry over to the enemy’s function. I thought it would be simpler to implement them both into the same function instead, however this is something I could possibly look into doing more efficiently.

Bibliography

photonstorm.com, P., 2021. Phaser – Examples – Ui Scene. [online] Phaser.io. Available at: https://phaser.io/examples/v3/view/scenes/ui-scene [Accessed 20 January 2021].

Photonstorm.github.io. 2021. Phaser 3 API Documentation – Namespace: Depth. [online] Available at: https://photonstorm.github.io/phaser3-docs/Phaser.GameObjects.Components.Depth.html [Accessed 20 January 2021].

Categories
Uncategorised

Developer Diary : Phaser Platforming Part 5

Developer Activity

As of December 28th, I’ve begun to add the final touches onto my game. This includes being able to switch between level 1 & 2 as well as creating and implementing some sounds into the game.

Using “BFXR.net”, I managed to create my own custom sounds for my game. This is essentially a free website that’s purpose is to help create some authentic retro sounds for your game, considering my game’s art style I reckon this would’ve been a good fit for it.

Bfxr is an elaboration of the glorious Sfxr, the program of choice for many people looking to make sound effects for computer games.

bfxr.net (2020)

For my game, I created three sound effects. All of these are for the player and include; the death sound played upon when the player’s death sprite is activated, jumping and stepping.

“Jump”
“Player Step”
“Die”

After creating these sounds, I inserted them into the assets folder alongside most of my spritesheets and pngs. These sounds were saved as Wav fil

Figure 1

Using the animation class, I set certain conditions on when these sounds will play.

As seen in Figure 2 and 3, I’ve created a function called “walkSound” which will activate under two different conditions. These conditions being when the player’s walk animation starts, and when it repeats.

Figure 2
Figure 3

What this does is that each time the player starts to walk, a stepping sound will play, this also goes for when the animation loops.

I’ve set it to play this way as to make the sounds play at a more accurate frequency whilst the player is walking, as the final and starting frame of the animation is when the player’s sprite puts their foot down.

In a similar fashion, I also did the same thing with the death sound. It only plays once the player’s “die” sprite is activated (See figure 4)

Figure 4

Something that was slightly more different to do was the “Jump” sound, this is because the controls to the player were in a seperate javascript file, being the basescene.js file.

The marked sections in Figure 5 show the variable for the jump sound being added, and then being played once the player makes a spacebar input.

Figure 5

Our SceneA and SceneB files extend from this file’s class as to carry over the player control functions to each scene, this helps save us a lot of time without having to reinsert this each time – I think this is quite a useful skill to learn for games development, it can even save space as well as time. So I consider it quite important to learn smart shortcuts such as these.

“Taking the existing Phaser classes and extending them to create reusable elements will speed up your game development and simplify testing and prototyping new levels, features, etc.”

Braelyn Sullivan (2020)

As shown in Figure 6, this is the starting line for SceneA, this is what enables our functions from the basescene.js to carry over to our game. So technically we could switch to a new scene, but not have to worry about rewriting our code from the basescene.js.

Figure 6

After doing all this, I’d manage to finally get sounds working for the player in my game, as demonstrated by Figure 7.

Figure 7

One final thing I managed to do was to create a working transition between SceneA and SceneB’s levels.

At first I had to add this onto my index.html file, which would enable both SceneA and SceneB to share the same config between scenes. This is so that the transition can work between levels (See Figure 8).

Figure 8

Within SceneA’s code, there is a function that when you collect a heart another scene will be started in Figure 9.

Figure 9

This will then load our SceneB.js file, in this we have the exact same code as before except we change our class and super to be SceneB (See Figure 10).

Figure 10

This part ended up going fairly smoothly, as it was quite a simple process to do – Figure 11 demonstrates the results of this in action.

Figure 11

Bibliography

photonstorm.com, P., 2020. Phaser – Examples – Audio – Sound Complete. [online] Phaser.io. Available at: <https://phaser.io/examples/v2/audio/sound-complete> [Accessed 2 January 2021].

Bfxr. 2021. Bfxr. [online] Available at: <https://www.bfxr.net/> [Accessed 3 January 2021].

docs.idew.org. 2018. [online] Available at: <https://docs.idew.org/video-game/project-references/phaser-coding/audio> [Accessed 3 January 2021].

Medium. 2020. Extending A Phaser Class To Make Reusable Game Objects. [online] Available at: <https://braelynnn.medium.com/extending-a-phaser-class-to-make-reusable-game-objects-93c11326787e> [Accessed 3 January 2021].