Categories
Uncategorised

Developer Journal : Digital Wellbeing

Digital Wellbeing

As of the 22nd of Monday, I’ve decided to cover a topic on digital wellbeing for my developer journal.

Digital Wellbeing is the idea of a state of personal wellbeing that’s from the use of technology, it can simply mean the improvement of a person’s well being through the use of media – but this can also include how the person maintains their relationship with technology.

“Digital wellbeing considers the impact of technologies and digital services on people’s mental, physical and emotional health”

Alicja Shah, 2019

People can use technology to stay in touch with distant family and friends, as well as use it for personal work – people are connected more than even in the world today. However, prolonged use to technology has negative side effects too as it can lead to psychological and physical issues.

Physically, staring at a screen for too long can induce digital eyestrain upon a user. This is because of exposure to Blue Light on most digital devices, overuse of this may lead to eyestrain and focusing problems.

“Digital eyestrain refers to blurred vision and other symptoms such as burning, stinging or tearing of the eyes associated with prolonged use of digital devices.”

Alicia Rohan, 2016

When using any digital devices, it is important to consider the 20/20/20 rule. (See Figure 1)

Debunking digital eyestrain and blue light myths
Figure 1 (medicalxpress.com)

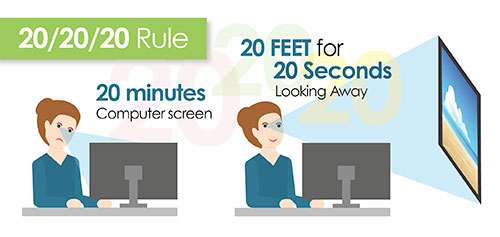
This rule explains that to maintain a comfortable vision when using digital devices, for every 20 minutes of digital device use you have to look away for 20 seconds focusing on something else 20 feet away – this can help reduce eyestrain.

Another issue that could arise from the use of technology on the psychological side would be the overuse and dependence on technology, prolonged use can lead to issues such as isolation and depression.

“Young adults aged 19–32 years found that people with higher social media use were more than three times as likely to feel socially isolated than those who did not use social media as often.”

Timothy J. Legg, 2020

It is also important considering that we are also currently living during the coronavirus, which means a lot of people are isolated already in-doors to stay safe and have to rely on technology to communicate with most of their friends.

Finding ways to reduce social media use can however help reduce feelings of isolation in some people.

I think that personally, I have managed to keep myself well kempt when it comes to the internet. As I already have a lot of experience compared to other people, however it is sometimes hard to keep up with my health as I sometimes spend too much time on my computer – this can affect my sleep as well as my workflow.

Bibliography

Marsden, P., 2020. What is Digital Wellbeing? A List of Definitions. [online] digitalwellbeing.org. Available at: https://digitalwellbeing.org/what-is-digital-wellbeing-a-list-of-definitions/ [Accessed 28 February 2021].

Shah, A., 2019. Defining digital wellbeing – Jisc Building Digital Capability Blog. [online] Jisc Building Digital Capability Blog. Available at: https://digitalcapability.jiscinvolve.org/wp/2019/09/03/defining-digital-wellbeing/ [Accessed 28 February 2021].

J. Legg, T., 2020. Negative effects of technology: Psychological, social, and health. [online] Medicalnewstoday.com. Available at: https://www.medicalnewstoday.com/articles/negative-effects-of-technology#:~:text=Social%20media%20and%20mobile%20devices,on%20developing%20children%20and%20teenagers. [Accessed 28 February 2021].

Rohan, A., 2016. Debunking digital eyestrain and blue light myths. [online] Medicalxpress.com. Available at: https://medicalxpress.com/news/2016-04-debunking-digital-eyestrain-blue-myths.html [Accessed 28 February 2021].

Categories
Uncategorised

Developer Diary : Tutorial

Development Activity

As of Monday the 15th, we had an independent study week where we were given the chance to work on anything we had to catch up with during our spare time. For this week, I chose to start and finish my tutorial task.

For this task, we needed to make a Phaser Tutorial on anything of our choice. I decided to do a basic tutorial on Matter that many beginner level users would be able to learn how to set up their own scenes as well, it will cover most of how to set it up and how the user can create small simple contraptions using the engine.

Writing a coding tutorial can better help develop a basic understanding of your subject matter, it can help you to build something small and simple at a deeper understanding – this understanding can aid you in future projects.

“It requires that you understand what you’re doing/building enough to be able to explain it to somebody else”

ryanjyost, 2019

A great way to start your process on this would be to try and pick up a topic you want to learn and write about, which could just about be anything you’re not so experienced with.

I felt as if writing a tutorial on the basics of Matter from the ground up has helped to show me understand what the most simplest way to start on a foundation for a program using Phaser, as I’ve managed to explain in detail most of what goes into making the program work at a core level.

Figure 1

After having explained how to put some simple objects with attributes together, throughout the tutorial I’ve also provided links to the Phaser 3 documents that the reader can check to further entice them into starting to explore and experiment with what they can do in the program.

I’ve also provided some in-game screenshots of what I was able to achieve using this simple level of understanding, within the tutorial I managed to put together a small simple physics contraption that made use of constraints. (See Figure 2)

Figure 2

I think that I’ve managed to provide a decent tutorial for anyone without much prior knowledge to using Phaser on how to set up a simple scene, I’ve also left a lot of what you could possibly do in the guide as open-ended as possible to encourage experimentation by leaving many links to the Phaser documentation the user could use to expand upon.

Matter I feel is a good way to introduce beginner level programmers to using Phaser, it touches upon how these programs are usually set up which can help to further a beginner level user’s understanding of the basics, there’s also plenty of attributes you can assign to even basic objects that make it fun to experiment and learn with.

It’s also got many examples you can try on the Phaser website:

https://phaser.io/examples/v3/category/physics/matterjs

Although the coding in the tutorial is kept as brief and as simple as possible, I feel as if the next time I get the chance to write a tutorial I could do something slightly more complex to help further encourage myself to learn more new things about Phaser.

Bibliography

Ryanjyost.com. 2019. How to write a coding tutorial. [online] Available at: https://www.ryanjyost.com/how-to-write-a-coding-tutorial/ [Accessed 23 February 2021].

photonstorm.com, P., 2021. Phaser – Examples – physics – Matterjs. [online] Phaser.io. Available at: https://phaser.io/examples/v3/category/physics/matterjs [Accessed 23 February 2021].

Categories
Uncategorised

Developer Journal : Presentation

Presentations

As of the 8th of February, this week was about preparing and starting our presentations on Entry Level Games Developer jobs.

We were put into our seminar groups for this project, so we had to work as a team to put together a single presentation – each of us had to find and pick our own entry level job we wanted to present. (See Figure 1)

Figure 1

We planned on doing three slides each; the first would be a brief description of the job and company, second would be about the key skills required to get the job and last would be our own thoughts and conclusion about the job – since our presentation also had to be roughly around 20 minutes long, we gave ourselves 5 minutes to speak through our slides.

One important thing we had to consider for our presentation was to keep things simple, so we made sure that most of the text on our slides were a big size and written briefly.

“You should be able to communicate that key message very briefly. The important thing is to keep your core message focused and brief.”

skillsyouneed.com, 2021

Before, our slides were packed with text and had a much more smaller font – this proved to be too hard for people to read in a presentation. Due to this, we changed our font size to something much more bigger and cut off most of the unimportant text.

We moved most of this information into our speaker notes, which we’d look upon whilst presenting. (See Figure 2)

Figure 2

Another important thing to cover here which would help with our presentations would be to consider the Dual Coding Learning Theory, this is where both images and written information are combined to provide an easy visual and verbal way for people to process information.

“Dual coding is combining words and visuals such as pictures, diagrams, graphic organizers, and so on. The idea is to provide two different representations of the information, both visual and verbal, to help students understand the information better.”

Megan Sumeracki, 2019

Following these rules, we cut the amount of content we intend to include on a slide and instead present everything in a simple concise way.

We can also use images to help our readers to get a rapid gist of what we’re talking about.

Information is lined up neatly and written briefly to give our readers confidence, most of the details are saved for when we start to speak about our slides.

“Visuals are powerful for communicating complex ideas in an efficient way; it takes a great many words to describe the simplest of images”

“Cut the amount of content we intend to include on a slide or resource; chunk the information into headings that stand out”

Futurelearn.com, 2021

Using a combination of both of these, ideas we’ve managed to create a slide that’s quick to the point and comes across as clear as possible. Here you can see the brief description of the job and company as well as some images of their logo and most well known games within the industry. (See Figure 3)

Figure 3

I think that I managed to learn quite a bit about how important it is to condense information when making something such as a presentation, I learnt that with things such as Dual Coding Learning Theory that there are better and simpler ways to get messages across.

This was fairly important for this lesson, as we were given a 20 minute time limit to do our presentations, so we had to focus on getting our message out as clearly as possible rather than outputting as much information that can overwhelm the readers.

I think that maybe if I were to try and do another presentation, then I should focus more on getting a good balance between text and images. As although we shortened most of our work, we didn’t provide as much images to show to our audience.

Bibliography

skillsyouneed.com, (2021. Top Tips for Effective Presentations | SkillsYouNeed. [online] Skillsyouneed.com. Available at: https://www.skillsyouneed.com/present/presentation-tips.html [Accessed 11 February 2021].

FutureLearn. 2021. An introduction to Dual Coding Theory. [online] Available at: https://www.futurelearn.com/info/courses/technology-teaching-learn-ing/0/steps/53322 [Accessed 11 February 2021].

Sumeracki, M., 2019. Dual Coding and Learning Styles — The Learning Scientists. [online] The Learning Scientists. Available at: https://www.learningscientists.org/blog/2019/6/6-1 [Accessed 11 February 2021].

Categories
Uncategorised

Developer Journal : Rewards in Games

As of the 1st of February, we covered responses to rewards in games within our lecture.

Rewards can be anything players earn from gameplay, players are given achievements for accomplishing certain tasks and improving their performance with scoring, these can be a good incentive to keep the player interested and playing your game.

“Rewards and scoring should also correlate to what you want people to learn and the feedback you want to offer to them re: their performance.”

Sharon Boller, 2013

Rewards can be good teaching tools for rewarding the player with feedback for specific tasks you want them to complete, this can be an effective way to teach certain gameplay elements you want to teach by offering them something in return such as some loot. (See Figure 1)

Image result for quest rewards
Figure 1 (runescape.wiki)

However there is a psychological effect to this, whenever we receive an award this triggers a special behaviour in our brain that allows it to get stimulated by the process of receiving a reward – This in turn leads us to seeking out more rewarding stimuli.

An example of a game that uses rewards like this could be “Pokémon Go”, which is an Augmented Reality Game about collecting Pokémon. Within it, you can collect Pokémon of all sorts of rarities – this is done using a schedule of reinforcement called a Fixed Ratio: This is where the reward occurs after a certain amount of actions.

In the Fixed Ratio schedule of reinforcement, a specific number of actions must occur before the behaviour is rewarded.

theconversation.com, 2016

If the user catches enough Pokémon, they will be rewarded with a level up, or even possess enough candy to evolve their Pokémon – There is also a slim chance the players will end up coming across rare Pokémon, which keeps players interested. (See Figure 2)

Figure 2 (theconversation.com)

This is what makes the app addictive, as players will continue to check the app regularly throughout the day due to these regular reward schedules.

In my personal opinion, I think rewards can be a good as a learning tool to the player and encourages them to play better at the game via scoring systems. This can help the player to enjoy the game much more through a fun system that rewards and incentivises good play.

However, I disagree with using rewards to keep players addicted through tedious gameplay as it means your game gets less fun and becomes more of a chore to play through. Many games use this to further desensitise the player’s stimuli and keeps them playing for much longer.

Bibliography

Boller, S., 2013. Learning Game Design: Rewards and Scoring | Knowledge Guru. [online] Knowledge Guru. Available at: http://www.theknowledgeguru.com/learning-game-design-rewards-scoring/#:~:text=Rewards%20can%20be%20anything%20players,Some%20games%20have%20them.&text=If%20the%20task%20in%20a,for%20performance%20rather%20than%20completion. [Accessed 11 February 2021].

The Conversation. 2016. The power of rewards and why we seek them out. [online] Available at: https://theconversation.com/the-power-of-rewards-and-why-we-seek-them-out-62691 [Accessed 11 February 2021].

RuneScape Wiki. 2021. Post-quest rewards. [online] Available at: https://runescape.wiki/w/Post-quest_rewards [Accessed 11 February 2021].

Categories
Uncategorised

Developer Diary : Matter Physics

Development Activity

For this week, we were given the task to use experiment with “Matter”, which is a plugin for Phaser which enables physics. This is different from the other games we’ve been developing as we haven’t used any other physics mode besides “Arcade”.

“The Phaser Matter plugin provides the ability to use the Matter JS Physics Engine within your Phaser games. Unlike Arcade Physics, the other physics system provided with Phaser, Matter JS is a full-body physics system.”

photonstorm.github, 2021

Using “Matter” will give us a full proper physics system that is dynamic, it will also allow us to create many things such as rigid bodies and physics constraints – which is what I’ve added in for my project.

One of the first things I started to try and implement into the project, was a functional bridge that consists of many individual objects constrained to each other (See Figure 1).

Figure 1

This bridge was created for the first scene of the game, and is meant to assist the player in getting past the first pit.

Within the create function of the code, to create this bridge I first had to define a variable to group multiple objects together, then create another for the bridge itself – the bridge variable will be assigned to be added as a “.stack” because we plan on using multiple instances here.

Using our assigned variable from earlier, we create a chain with our bridge and then add a world constraint at our first and last instances created with at the chain – world constraints help to fix these ends of the bridge onto a specific Y and X axis without the object falling over.

“Constraints are used for specifying that a fixed distance must be maintained between two bodies (or a body and a fixed world-space position). The stiffness of constraints can be modified to create springs or elastic.”

brm.io, 2021

The final constraint for the other end of the bridge is added by specifying the total length of the bridge’s bodies in an array and inputting the similar code as before, only changing the coordinates (See Figure 2).

Figure 2

Another addition to the first scene I’ve added was a simple ball that’d block the player’s way, players traversing the bridge will have to try and jump over the ball or try to roll it into a nearby pit to use as a small platform (See Figure 3&4).

Figure 3
Figure 4

Creating this object was fairly simple, as I just had to preload an image of a circle I had and then in the game’s create function I included a new variable called “ball” which simply added in my image.

Although, this doesn’t mean the image spawned in itself has the collision of a ball, so we have to declare that the object has circular collision by using “.setCircle”.

Figure 5

The second scene of the game introduces a new mechanic where the player is able to click and drag onto certain objects, they use this mechanic later on in the level to try and build a staircase to the level’s goal point.

The player’s first obstacle in this level as you can see is a whole bunch of crates blocking their way, alongside one single image one tutoring the player that these blocks can be dragged.

Figure 6

For this to work, I implemented special objects that have been assigned a collision group referred to as “canDrag” (See Figure 7).

Figure 7

I’ve also implemented an extra control using the mouse called “mouseSpring” which enables the player to pick up certain objects with the mouse, this is helped by including a collision filter which enables it to only work on certain objects such as our “canDrag” objects (See Figure 8).

Figure 8

An effective way this mechanic is used is for a puzzle at the end of the level where the player’s entrance to the goal point is being blocked by several crates (See Figure 9).

Figure 9

Using the drag mechanic, they’re able to move the boxes out of the way and can even arrange them into a staircase to help themselves climb up onto the platform easier (See Figure 10).

Figure 10

I found learning Matter in Phaser to be quite fun, as I enjoy a lot of physics games. We were also given some time to try and experiment with this project more, which felt like there was some creative freedom to it.

Although one issue I have is that it is hard to find documentation on Matter, some features such as the bridge had no texture or fill so they couldn’t be seen unless debug mode was enabled – I could not find anything online that could help me with this – However, this was only a small issue I had with the project, as I feel the rest of it went fine.

Bibliography

Photonstorm.github.io. 2021. Phaser 3 API Documentation – Class: MatterPhysics. [online] Available at: https://photonstorm.github.io/phaser3-docs/Phaser.Physics.Matter.MatterPhysics.html [Accessed 2 February 2021].

photonstorm.com, P., 2021. Phaser – Examples – Drag Filter With Pointer. [online] Phaser.io. Available at: https://phaser.io/examples/v3/view/physics/matterjs/drag-filter-with-pointer [Accessed 2 February 2021].

photonstorm.com, P., 2021. Phaser – Examples – Bridge. [online] Phaser.io. Available at: https://phaser.io/examples/v3/view/physics/matterjs/bridge [Accessed 2 February 2021].

Brm.io. 2021. [online] Available at: https://brm.io/matter-js/docs/classes/Constraint.html [Accessed 3 February 2021].

Photonstorm.github.io. 2021. Phaser 3 API Documentation – Namespace: Collision. [online] Available at: https://photonstorm.github.io/phaser3-docs/Phaser.Physics.Matter.Components.Collision.html [Accessed 3 February 2021].

Categories
Uncategorised

Developer Diary : Maze

Development Activity

For this week, we’ve been working on a maze game that’d randomly generate a maze each time the player opened up the game. I learnt to try and implement textures from a tile sheet of my own as well as trying to generate my own simple structures into the maze.

First task I tried to do was implementing my own textures into the game, this required me to add two extra pngs to the assets folder of the game; “tilesDecoration” for randomized decorations, “tilesStructure” for the tiles of the structures that’ll be appearing throughout the game (See Figure 1).

Figure 1

How this works is that I’ve used a constant variable to define each tileset asset and gave them each a different ID, having these set as constant variables means that they cannot be altered by the program during regular execution – this is important as we will be reusing most of these values during our code.

Constants are useful for defining values that are used many times within a function or program. … By using constants, programmers can modify multiple instances of a value at one time.

Techterms, 2013

Once the constants are created, we then create another variable which will act as a layer within the game.

As shown in the bottom half of Figure 2, you can see the first three lines of code using our constant variables for every specific layer included with a unique ID for each. Afterwards the maze will then generate these tiles into the game.

Figure 2

Before we generate our tiles onto a path, we need to specify which tiles are needed to spawn and to place them in a random order. This is done within our MazeTiles.js file.

As shown in Figure 3, we have declared static variables for how we’d want the order of these tiles to be generated. For the main tilesheet, the variables are; “GetFloorTile”, “GetWallTile”, “GetHomeTile”, “GetDiasTile” and “GetWinTile”.

The first three will pick a random tile between a specific point, such as “GetFloorTile” choosing the first 16 random tiles to arrange onto a layout. Other variables such as “GetWallTile” and “GetHomeTile” will start off on a specific number as indicated by the number after the “return” function at the start and then add on the random number to choose between.

For our other tilesheets, we would have to use “GetDetailTile” as we have a different arrangement on tiles on these sheets, all of which being a selection of 4 tiles (See Figure 3).

Figure 3

As shown here in Figure 4, this is how our tiles will be arranged in the game. This code here generates our tiles onto a certain position within a unit (This is each area within our maze), it will generate some floor tiles on the area first, and then some wall tiles on the edges of the unit – these typically have been assigned the “groundLayer” variable.

Near the bottom, you can also notice the “detailLayer” variable being used for the centre fill, this fills the centre of each unit. However, our detailLayer has been assigned a random chance of spawning each tile by 10% chance (0.1 out of 1).

This makes details appear much less often and makes each room feel more unique and different from eachother.

Figure 4

As shown in Figure 5, this is what all of our tile arrangements look like within the game. You can see our walls and floors being arranged on most of the main units with some sprinkles of tiles from our “detailLayer”.

On the bottom right of the image is the custom unit I’ve created, which uses unique tiles from the “structureLayer”.

Figure 5

Unit layouts in the code are generated by detecting a place within the game space, and spawning some tiles within that designated area.

As Shown in Figure 6, the starting room for instance, looks for the middle of every layout by dividing the room’s height and width in half and placing the tiles directly in this spot.

Figure 6

For my own custom unit, I decided to go with a room that would be generated within a random place in the level.

To do this, I declared some variables at the start of the code which would be assigned a random number multiplied by the level’s height and width to give it some some accurate coordinates to be placed within as shown by Figure 7.

Figure 7

To get the position of the room, this line of code here is assigned the variables and inserts them as the room’s coordinates as seen in Figure 8.

Figure 8

The code here in Figure 9 shows that if one of the units positions within the level is equal to that of our randomUnit, then it will spawn the room here as well as assigning it a unique tileset compared to our other unit.

Figure 9

As shown by Figure 10 & 11, the room spawns in completely random places within the level – sometimes directly next to the middle of the level or either the far edges of it.

Figure 10
Figure 11

One particular issue that arises from this however is that there is a random chance that this will spawn on top of our player spawn.

I consider this project to be mostly a success, as I was able to implement most of what I had planned as well as tweaking them slightly to make improvements.

One problem I’d struggled with before was trying to implement multiple tilesets into the scene as I had tried to use a single variable before, however using multiple constant variables to assign new tileset images with unique IDs had worked out for me.

This meant that any new tileset I’d add into the assets folder would be given a fresh ID to help the code distinguish it from the others – I feel as if I have gotten a slightly better grasp on the concept of using constant variables from this.

Bibliography

Docs.microsoft.com. 2018. Const Statement – Visual Basic. [online] Available at: <https://docs.microsoft.com/en-us/dotnet/visual-basic/language-reference/statements/const-statement> [Accessed 26 January 2021].

Techterms.com. 2013. Constant Definition. [online] Available at: <https://techterms.com/definition/constant> [Accessed 26 January 2021].

Categories
Uncategorised

Developer Diary : Tank Game

Development Activity

For this week, we worked on a tank game during Tuesday in class using Phaser. Included in the project, we were also tasked to add on at least two customizations for the game as well.

The two addition I have decided to add to the game was a UI element that displayed the player’s current health, and some health pickups that dropped by random chance from defeated enemies (See Figure 1).

Figure 1

To add the text, I created a variable called ‘healthDisplay’ and assigned some text to it.

This text would subtract the player’s current ‘damageCount’ and ‘damageMax’ which would then display the amount of hitpoint’s the player has (See Figure 2)

Figure 2

Another important thing I added was to set the depth of the UI display to a high number, this is so that the UI can be drawn above most of the objects in the scene – this prevents anything from obscuring it such as enemies and projectiles.

The depth is also known as the ‘z-index’ in some environments, and allows you to change the rendering order of Game Objects, without actually moving their position in the display list.

The default depth is zero. A Game Object with a higher depth value will always render in front of one with a lower value.

Phaser 3 API Documentation, 2021

User interfaces are known to be specially important within games as they can display vital information to the player such as health, ammo or any general hud element that player has to keep track of.

This is typically why user interfaces are always on front, as obscuring them may prove to be unfair and frustrate the player from keeping track.

I’ve also made sure that the health user interface updates within the player’s bullet collision function as shown in Figure 3.

Figure 3

This is fairly simple as it is similar to our other line from before, however instead of adding text we are just setting the text in our variable to update the player’s health by setting it to their current damage variables.

The Player’s ‘damageMax’ is set to 20, this means the max amount of damage they can take is 20 hit points, when they take a hit their ‘damageCount’ goes up by one.

Figure 4

As shown by Figure 4, this is the player’s health as normal when unaffected. So the sum in the text we set is essentially 20 subtracted by 0, which displays full health.

For the pickups, I used a new javascript file and added a pickup class that I’ll be extending.

Figure 5

What Figure 5 is essentially showing is that any variable that appears from the ‘PickupHealth’ class from this file will inherit the following functions.

Amount, which is the number of health given back.

An enabled physics body as to make sure collisions can work with each object inheriting from the class.

For the pickups, I plan for them to randomly drop from defeated enemies, Which is where the variables for them will come in.

Figure 6

As shown in Figure 6 within the main scene’s code, I added a new variable called ‘randNumber’, what this does is that it currently has a number set to 0 at the start of the code.

However each time an enemy tank is defeated, within their ‘IsImmobilizeed’ function the ‘randNumber’ variable is called upon and is changed into a random number from 0 to 4 using the ‘Math.Floor’ and ‘Math.random’ features.

If the variable’s number matches the if statement’s conditions, then a new variable is created within the function using our recently created ‘PickupHealth’ class.

Figure 7

Once the player collides with the pickip, the function calls for ‘burgerHitPlayer’. This function essentially takes away one point of the player’s damage count using the pickup’s ‘amount’/

It is also noted that the text of the user interface from earlier is updated too.

Figure 8

Figure 8 shows a before and after of the player picking up health, the top image shows the pickup’s being spawned into the level via enemy drops.

Once the player collides with these, they disappear and the player’s health interface increases.

Although this is most of what I’d done this week, if I were to of had more time to expand upon this game then I would include possibly more pickup types with different functions for the player to experiment with.

However I am pleased with how far I managed to get and feel as if I have a better understanding of how to implement features such as these.

The bit I enjoyed doing the most was trying to make it so my pickups and health interface worked together, this was because it was quite satisfying to implement two features that both came hand in hand – picking up health would directly involve the user interface to change and to keep track of the player’s hit points.

One of the hardest parts for me to figure out was trying to make it so the pickup drops would be randomly dropped from enemies, the issue was that I wanted to implement the random chance as its own function rather than including it in an already existing function – as this was hard to figure out due to many issues trying to get its values to carry over to the enemy’s function. I thought it would be simpler to implement them both into the same function instead, however this is something I could possibly look into doing more efficiently.

Bibliography

photonstorm.com, P., 2021. Phaser – Examples – Ui Scene. [online] Phaser.io. Available at: https://phaser.io/examples/v3/view/scenes/ui-scene [Accessed 20 January 2021].

Photonstorm.github.io. 2021. Phaser 3 API Documentation – Namespace: Depth. [online] Available at: https://photonstorm.github.io/phaser3-docs/Phaser.GameObjects.Components.Depth.html [Accessed 20 January 2021].

Categories
Uncategorised

Developer Diary : Phaser Platforming Part 5

Developer Activity

As of December 28th, I’ve begun to add the final touches onto my game. This includes being able to switch between level 1 & 2 as well as creating and implementing some sounds into the game.

Using “BFXR.net”, I managed to create my own custom sounds for my game. This is essentially a free website that’s purpose is to help create some authentic retro sounds for your game, considering my game’s art style I reckon this would’ve been a good fit for it.

Bfxr is an elaboration of the glorious Sfxr, the program of choice for many people looking to make sound effects for computer games.

bfxr.net (2020)

For my game, I created three sound effects. All of these are for the player and include; the death sound played upon when the player’s death sprite is activated, jumping and stepping.

“Jump”
“Player Step”
“Die”

After creating these sounds, I inserted them into the assets folder alongside most of my spritesheets and pngs. These sounds were saved as Wav fil

Figure 1

Using the animation class, I set certain conditions on when these sounds will play.

As seen in Figure 2 and 3, I’ve created a function called “walkSound” which will activate under two different conditions. These conditions being when the player’s walk animation starts, and when it repeats.

Figure 2
Figure 3

What this does is that each time the player starts to walk, a stepping sound will play, this also goes for when the animation loops.

I’ve set it to play this way as to make the sounds play at a more accurate frequency whilst the player is walking, as the final and starting frame of the animation is when the player’s sprite puts their foot down.

In a similar fashion, I also did the same thing with the death sound. It only plays once the player’s “die” sprite is activated (See figure 4)

Figure 4

Something that was slightly more different to do was the “Jump” sound, this is because the controls to the player were in a seperate javascript file, being the basescene.js file.

The marked sections in Figure 5 show the variable for the jump sound being added, and then being played once the player makes a spacebar input.

Figure 5

Our SceneA and SceneB files extend from this file’s class as to carry over the player control functions to each scene, this helps save us a lot of time without having to reinsert this each time – I think this is quite a useful skill to learn for games development, it can even save space as well as time. So I consider it quite important to learn smart shortcuts such as these.

“Taking the existing Phaser classes and extending them to create reusable elements will speed up your game development and simplify testing and prototyping new levels, features, etc.”

Braelyn Sullivan (2020)

As shown in Figure 6, this is the starting line for SceneA, this is what enables our functions from the basescene.js to carry over to our game. So technically we could switch to a new scene, but not have to worry about rewriting our code from the basescene.js.

Figure 6

After doing all this, I’d manage to finally get sounds working for the player in my game, as demonstrated by Figure 7.

Figure 7

One final thing I managed to do was to create a working transition between SceneA and SceneB’s levels.

At first I had to add this onto my index.html file, which would enable both SceneA and SceneB to share the same config between scenes. This is so that the transition can work between levels (See Figure 8).

Figure 8

Within SceneA’s code, there is a function that when you collect a heart another scene will be started in Figure 9.

Figure 9

This will then load our SceneB.js file, in this we have the exact same code as before except we change our class and super to be SceneB (See Figure 10).

Figure 10

This part ended up going fairly smoothly, as it was quite a simple process to do – Figure 11 demonstrates the results of this in action.

Figure 11

Bibliography

photonstorm.com, P., 2020. Phaser – Examples – Audio – Sound Complete. [online] Phaser.io. Available at: <https://phaser.io/examples/v2/audio/sound-complete> [Accessed 2 January 2021].

Bfxr. 2021. Bfxr. [online] Available at: <https://www.bfxr.net/> [Accessed 3 January 2021].

docs.idew.org. 2018. [online] Available at: <https://docs.idew.org/video-game/project-references/phaser-coding/audio> [Accessed 3 January 2021].

Medium. 2020. Extending A Phaser Class To Make Reusable Game Objects. [online] Available at: <https://braelynnn.medium.com/extending-a-phaser-class-to-make-reusable-game-objects-93c11326787e> [Accessed 3 January 2021].

Categories
Uncategorised

Developer Diary : Phaser Platforming Part 4

Development Activity

As of December 21st, I’ve begun adding some more progress onto my platformer game, I’ve now implemented a couple of new animations for the player as well as starting on the enemies and obstacles of the game – there are also game start and game over screens too.

At first, once I loaded the game it was quite blurry due to the canvas having to stretch the small sprites out onto a bigger screen as shown on Figure 1.

Figure 1

The game screen’s is around 256 pixels wide and high as to compensate for the small sprites, to keep the art sharp and from being stretched we have to include a very important feature in our config part of our HTML file for Phaser which enables pixel art mode (See Figure 2).

Figure 2

Now that this has been enabled, the has a much more sharper look.

Figure 3

This was a feature that I had found on the Phasers website’s example pages, and is also what I used as a reference for my own code:

http://phaser.io/examples/v3/view/game-config/pixel-art-mode

Figure 4 (Courtesy of Phaser)

I’ve also implemented some working player animations into the game, this includes; walking, jumping and dying (See Figure 5).

Figure 5

Most animations as shown, are first created within SceneA’s file which is when the game is in action (See Figure 6).

You can see many of these animations are assigned to a certain key, these can be activated throughout the code and even by player input which is how it works for the player’s animations.

Figure 6

In Figure 7, as you can see if any of the arrow key inputs on the keyboard are pressed then the code will first check if the player’s body is being blocked by anything underneath it – this means that the player is standing on top of a surface and thus will play a normal walk animation.

There is also an else if function to determine whether the player is standing still on this surface or not, if so then the idle animation will play – this is triggered when none of the player inputs are being pressed.

However, if the player is not standing on any surface, then this must mean that they’re in mid-air – this is where we would want to play our jump animation.

Figure 7

Within the game there is also some enemies, those being bats and sawblades.

The sawblades are pretty much a static enemy that stays in space, they take up around 32×32 pixels, so they can cover quite a large amount of area. The player will most likely have to jump over to avoid them properly as they will obstruct their path.

Once the game has started up, the code will try to detect the objects layer of our tiled layout and then try to find any object labelled ‘saw’, for each point it finds a saw will then be spawned there.

Figure 8

If the player collides with the saw, then this function will be activated. As shown in Figure 9, once activated the game will trigger a death animation for the player as well as removing the saw’s collider as to not accidentally trigger the collision again.

Figure 9

I’ve also started on doing the second level for this game, which will feature some parallax backgrounds as well as an enemy that can move.

As seen in Figure 10, I have added a new layer to the tiles with the name ‘middetail’. You can also see that I have added a bat spawn object included with a destination for it to move.

Figure 10

For the parallax tiles to work, I needed to set a scrollfactor onto the layer to make it scroll at a certain speed compared to the other layers.

“Parallax scrolling is when the website layout sees the background of the web page moving at a slower rate to the foreground, creating a 3D effect as you scroll.”

Alex Black, 2020

Figure 11 shows the new layer being made, and a “setScrollFactor” component being added onto it.

Figure 11

When I move my character forwards, the ‘middetail’ layer of the level slides slightly more to the right at a different pace than the other layers. This is our parallax details at work (See Figure 12).

Figure 12

Here you can also see the bat enemy ai at work here, when the bat spawns it simply travels between its spawn point and assigned destination at figure 13.

Figure 13

As shown in Figure 14’s code, we create a for loop with variables for our spawn and destination, as well as a ‘line’ for our enemy to follow. Both the ‘batspawn’ and ‘batdest’ objects in our tiled layout will be detected by the findpoint as well as a ‘+ i’ which helps count for multiple instances of the object.

A line is then created between our spawn and destination, the bat will then follow this line. There is also a yoyo and ease component which allows it to move back and forward albeit at a smoother pace as evident by the gif on Figure 13.

Figure 14

The game also has some screens for when it starts up as well as when the player fails too.

As shown in Figure 15 the game starts off with a straightforward message that the player can click to begin. Once the player dies, a game over screen is presented in-which the player can click on to restart the game back from the start.

Figure 15

Within the code are two functions, the startgame function is activated once the game is started up and enables the player to resume control once a mouse input is detected, the end screen is quite similar although it sets off a restartgame function.

There is also an alpha component which gradually increases to give it an easing effect, this makes the transition between screens look more smooth.

Figure 16

The game over screen function is also triggered once the animation for the player dying is completed as seen on Figure 17.

Figure 17

Bibliography

photonstorm.com, P., 2020. Phaser – Examples – Pixel Art Mode. [online] Phaser.io. Available at: <http://phaser.io/examples/v3/view/game-config/pixel-art-mode> [Accessed 30 December 2020].

Bloq, C., 2020. 18 Stunning Parallax Scrolling Websites. [online] Creative Bloq. Available at: <https://www.creativebloq.com/web-design/parallax-scrolling-1131762> [Accessed 30 December 2020].

Categories
Uncategorised

Developer Diary : Phaser Platforming Part 3

Development Activity

As of December the 14th, I’ve started work on my own platformer game on Phaser. To start myself off I created some sprites for the player as well as some tiles to use.

Using my knowledge on spritesheets, I created some player animations using Piskel, which is a browser based editing software which specializes in pixel art animations.

This site is particularly handy to use as described, you are able to see a preview of your sprite’s animation on the fly, as well as easily being able to export sheets into columns.

“Piskel is an easy-to-use sprite editor. It can be used to create game sprites, animations, pixel-art… It is the editor used in piskelapp.com.”

Piskelapp.com (2020)

Using this software, I created a whole spritesheet containing all the necessary player animations I’ll need for the platformer; this includes idle sprites, walking sprites, jumping sprites and even a death sprite.

You can see the whole spritesheet on figure 1, and a preview of all the animations on figure 2. Each frame on the spritesheet is around 16×16 pixels in size, although depending on the game I may have to make the sprites bigger so that the player is more easily visible – however I can also move the camera to a smaller resolution.

Figure 1 (Self Collection)
Figure 2 (Self Collection)

As shown on figure 3, I’ve also created a simple small tilesheet containing mostly square tiles that were 16×16, these are what I plan to be on the collision layer of the game which is the surface the player will be able to collide with.

Included on the far right are also some details, which will be on a details layer and won’t collide with the player.

Figure 3 (Self Collection)

On Figure 4, using Tiled I created a simple layout for the first level, as you can see I’ve also created some separate layers for the tiles on the right for both solids and details.

Figure 4

I’ve also included an objects layer, which contains the player and goal’s spawn. The purpose of these is to add some extra information to our tilemap which will prove useful later on during our coding.

This enables us to easily place a player spawn point precisely where we want without having to specify coordinates in our code for the placements of our objects.

“Using objects you can add a great deal of information to your map for use in your game. They can replace tedious alternatives like hardcoding coordinates (like spawn points) in your source code or maintaining additional data files for storing gameplay elements.”

Tiled stable (2019)

For the purpose of this game, I will be using this feature for the player spawns as well as many other objects. This will help save more time for the project in an albeit more efficient way as well.

As you can see in-game, I’ve managed to get the tilesheet to load in-game as well as getting the player and goal spawns to work (See Figure 5).

Figure 5

How I managed to do this was at first I had to make sure the tilesheet and json file for the level I’d created in Tiled were preloaded into the game.

Afterwards once the game starts and the program creates our objects, the code would then try to search for a point within SceneA (Which is our first level) and look for some of the key points we inserted into our Tiled level earlier, such as the spawn and goal points we had on our objects layer.

Figure 6

As shown from Figure 6, the bottom part shows how the code tries to find a spawn point for the player.

At first it searches through our objects layer on our Tiled level and looks for our “playerSpawn” entity with the same name, once it finds this, it then adds the player’s sprite to the starting point.

Bibliography

Descottes, J., 2020. Piskel – Free Online Sprite Editor. [online] Piskelapp.com. Available at: https://www.piskelapp.com/ [Accessed 26 December 2020].

Doc.mapeditor.org. 2019. Working With Objects — Tiled 1.4.2 Documentation. [online] Available at: https://doc.mapeditor.org/en/stable/manual/objects/ [Accessed 27 December 2020].