Categories
Uncategorised

Developer Diary : Phaser Platforming Part 2

Development Activity

During the 8th of December, we did some more work using Phaser and creating another platformer prototype to experiment with. For this session, we focused more on creating using parallax tiles as well as some UI elements such as game start and over screens included.

One of the elements we created for this prototype was to create a parallax background using the program “Tiled”.

This is a program made to make level design much more faster and easier, it uses spritesheets which have a structure consisting of square tiles, it also can do different types of tiles as well.

Tiled supports editing tile maps in various projections (orthogonal, isometric, hexagonal) and also supports building levels with freely positioned, rotated or scaled images or annotating them with objects of various shapes.

(Thorbjørn Lindeijer, 2020)

I figure this might be easy for me to get the hand of, as I’ve also had some experience in creating tiled spritesheets before in the past, as shown on Figure 1. Included in the diagram I have an empty tile which I’ve labelled its size, each tile in the image is around 32×32 pixels.

Figure 1 (Self Collection)

For our game, we’ll have 3 separate layers to our tiles; the decoration layer which will have decorative tiles that the player can walk through, the collision layer representing platforms that the player will be able to move on, and the midground layer which will be the layer that scrolls with the parallax background – thus emitting a 3D-like effect (See Figure 2).

Figure 2 (Self Collection)

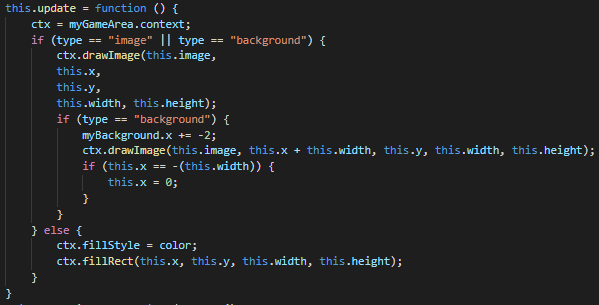
How this works in the code is that when we load our tiles, we set a “ScrollFactor” to the midground layer.

What this does is control the influence of the movement of a camera upon a certain game object. For example, when a camera scrolls it will change the position at which this game object is rendered on screen, it doesn’t change the game object’s actual position values however.

“A value of 1 means it will move exactly in sync with a camera. A value of 0 means it will not move at all, even if the camera moves. Other values control the degree to which the camera movement is mapped to this Game Object.”

(photonstorm, 2020)

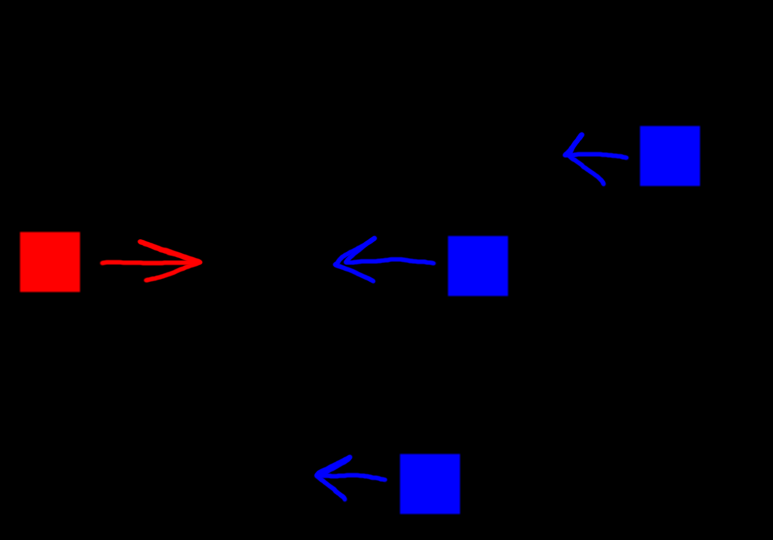
For our code, we may want to set this layer to have a scroll factor of 0.5 as our background may have a different and much higher one. This’ll also enhance the effect even more making it look like multiple objects are moving in the background at different distances (See Figure 3).

Figure 3 (Self Collection)

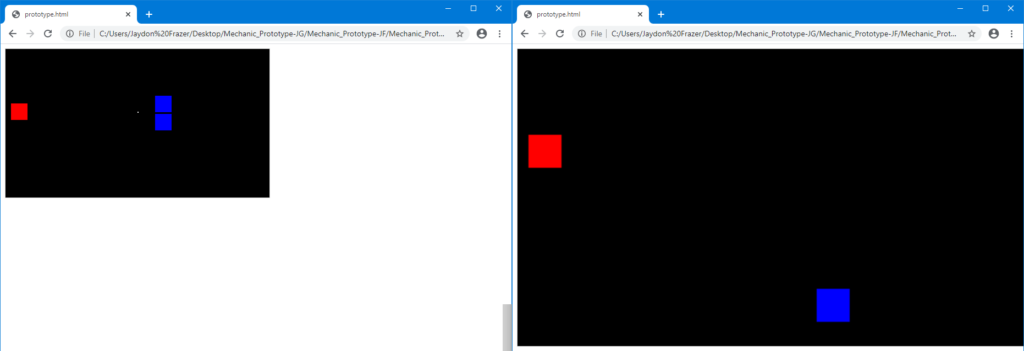
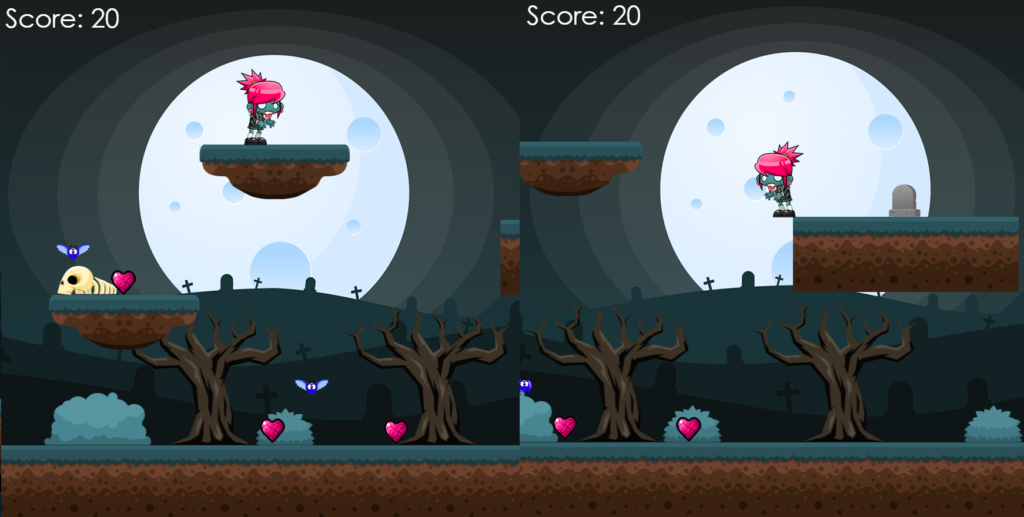
Figure 4 shows how this works in-game, as I move the character to the right notice how the hearts on the gameplay layer move independently from the trees and bushes (Which is our midground layer).

Figure 4 (Self Collection)

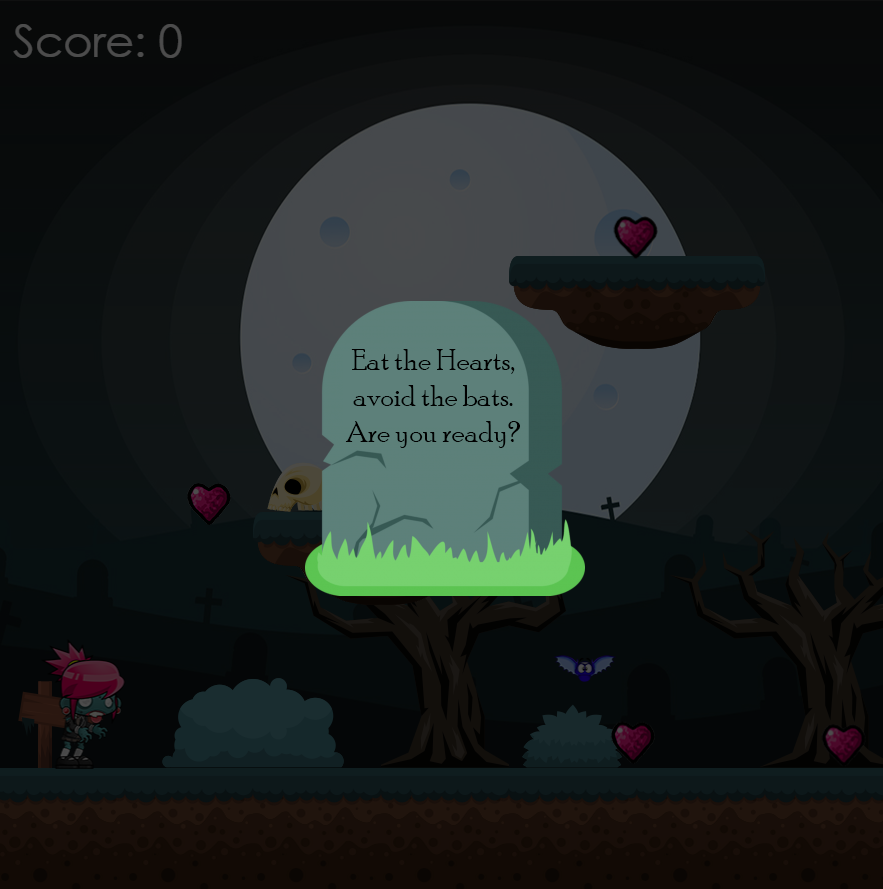
What we also did for our game was learn to create some simple UI screens which would enable the player to start and reset the game if they had died (See Figure 5).

Figure 5 (Self Collection)

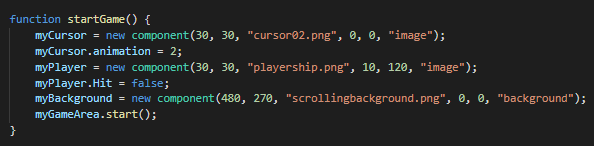
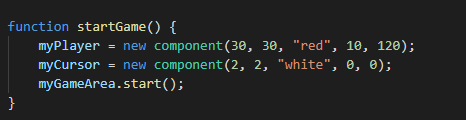
We created several functions that would trigger once the game started and ended, these being “startGame()” and “showEndScreen()” (See Figure 6).

Figure 6 (Self Collection)

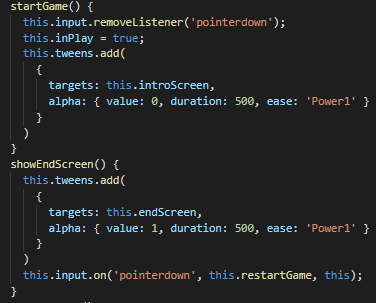
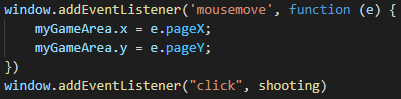
What happens in startGame() is that once the player inputs a mouse click then the program targets the introscreen’s object and sets its alpha (This controls the transparancy of the object) to 0, the duration also determines how fast it goes from 1 to 0.

This essentially hides the start screen once the player clicks to start, this is pretty much some very basic UI.

The opposite happens with showEndScreen(), in which the value is set from 0 to 1, making the image non-transparent. There is also an extra part of the function which restarts the game.

Although this is some fairly basic UI, I reckon that I might be able to create some simple menus if I were to expand upon doing these. This could possibly be down with multiple different inputs aside from the mouse click in-which we could give the player the option to restart or exit the game.

I can use the UI in my game to help convenience the player better, it will also make explaining the game much less vague to them.

Bibliography

Editor, T., 2020. Tiled Map Editor By Thorbjørn. [online] itch.io. Available at: <https://thorbjorn.itch.io/tiled> [Accessed 19 December 2020].

Photonstorm.github.io. 2020. Phaser 3 API Documentation – Namespace: Scrollfactor. [online] Available at: <https://photonstorm.github.io/phaser3-docs/Phaser.GameObjects.Components.ScrollFactor.html> [Accessed 20 December 2020].

Categories
Uncategorised

Developer Diary : Phaser Platforming

Development Activity

During class this week, we were looking into creating a platformer in Visual Studio using HTML and JavaScript. To do this, we studied a HTML5 framework called ‘Phaser’, which is an open source framework that allows us to use it to make our own games.

“Phaser is a fast, free, and fun open source HTML5 game framework that offers WebGL and Canvas rendering across desktop and mobile web browsers.”

(photonstorm, 2020)

For the first week we just mostly covered some documentation on the framework using the documentation wiki for the framework, we later on used this as a reference for some of our projects this week.

The website manages to cover a wide range of the framework’s functions ranging from; namespaces, classes, events, game objects, scene and even physics (See Figure 1).

Figure 1 (Courtesy of photonstorm)

To enable ‘Phaser’ for our project, we had to install a JavaScript file with the same name. Then, we would put alongside the other file where we’d be writing our main code (See Figure 2).

Figure 2

We also run both the scripts simultaneously as soon as the program starts up by declaring the sources within our HTML file as shown on Figure 3. Our program will load the ‘phaser.js’ file first as it comes before our main file titled ‘FirstScene.js’ (See Figure 3).

Figure 3

To start off, we had to create a scene for our project. This would be our first room in the game and where all the action would take place (See Figure 4).

This would also be considered as a part of a class, as it would have some other similar functions tied to it as well such as animations and objects.

Figure 4 (Courtesy of photonstorm)

Once we started writing out our code, we declared a class-name and then extended from our main code template to phaser’s base template as shown in Figure 5.

Figure 5

How this works exactly is that this enables for you to use the same information in more than one place, this means that there wouldn’t be any need to repeat yourself when writing code in different files.

This usually can help to save plenty of time when working on a project as you won’t need to do as much work rewriting entire blocks of code when using different templates.

“Templates help when you want to use the same information or layout in more than one place. You don’t have to repeat yourself in every file. And if you want to change something, you don’t have to do it in every template, just one!”

(djangogirls.org, 2020)

For this project, we also covered in class how to use assets within the engine such as sprite animations. In our project we had an assets folder stored alongside our JavaScript one, located in this folder were several png files for assets like platforms and the player animations (See Figure 6.

Figure 6

To ensure that these would be loaded into the game, we had to use a preload method, which is called before the scene’s ‘create’ method, this allows us to preload assets that the scene may need as shown in Figure 7

Figure 7

These were mostly just singular images that had been loaded in, however we also had to add in a player sprite-sheet which would consist of multiple frames that had to play specific animations.

To start off I used a sprite-sheet I’d made awhile ago as shown in Figure 8, this just contains a simple walk cycle facing left and right as well as an idle animation in the centre too (See Figure 8).

Figure 8

How this would work in the program is that the sprite’s frames are assigned a specific size that each sprite would be fitted into, for this one each frame of the sprite-sheet is considered 32 pixels wide, and tall.

This is as shown in Figure 9, where I set the size of the frames.

Figure 9

When any of the current controls are pressed, depending on the key being pressed the program will select a starting and ending point with frames that will then be played and looped.

For instance, holding the left key will play the frames of the sprite-sheet between 0 and 5, which are the walking sprites facing left.

On the right key being pressed, it will play the frames from 7 to 12 which is the animation for the right walking animation.

If neither of these buttons are being pressed, then an idle animation will be triggered, in which it will just stay on a single frame (See Figure 10)

Figure 10

Before creating an actual sprite-sheet, I looked towards researching how to create one myself. To put it into more detail, a sprite is considered to be a single graphic image that can appear as a part of a scene.

“Sprites are a popular way to create large, complex scenes as you can manipulate each sprite separately from the rest of the scene. This allows for greater control over how the scene is rendered, as well as over how the players can interact with the scene.”

(Steven Lambert, 2013)

Frames are put into an order that creates a continuous movement, which then creates a cycle.

This is started off by creating a function that creates the image and then sets its path – as spritesheets may have different sizes we will also have to consider the frame’s width and height (This has to be the same for each sprite to make drawing the animation much easier).

How the animation will work in-game is that it needs to be updated constantly.

“To update the spritesheet animation, all we have to do is change which frame we will draw. Below is the spritesheet divided into each of its frames and numbered.”

(Steven Lambert, 2013)

This is explaining what is goes on in Figure 11, each frame of the animation will be played in a specific order.

spritesheet divided into frames and numbered
Figure 11 (Courtesy of Steven Lambert)

add some reflection (I like doing spritesheets because i like art) (wolud i wanna use this myself?) (Where would i use it how would i use it) (what other games use this that i wouldn’t mind emulating?)

This would be something that I might be able to get the hang of quite quickly, as I particularly enjoy doing sprite sheets because I also enjoy creating art in my spare time – which can vary between pixel art or small animations.

I’ve already got some experience in doing so from before in the past and this project, so I think I am well capable of doing sprite-sheets whether it’s for the player or some other details within the game.

I could however also try to look towards any particularly styles of animation that I like from other games, for example I could make use out of doing “Sub-pixel” animation, as present in games such as Metal Slug which is a game well recognised for it’s pixel art and animations.

Luis Zuno (2019)

An example of sub-pixel animation can be shown from this video, as it goes into depth about explaining how games with pixelated art styles can create a more subtle animation on smaller sprites which is done via colour value shifting.

Bibliography

Photonstorm.github.io. 2020. Phaser 3 API Documentation – Index. [online] Available at: <https://photonstorm.github.io/phaser3-docs/> [Accessed 8 December 2020].

Tutorial.djangogirls.org. 2020. Template Extending · Honkit. [online] Available at: <https://tutorial.djangogirls.org/en/template_extending/> [Accessed 8 December 2020].

Lambert, S., 2013. An Introduction To Spritesheet Animation. [online] Game Development Envato Tuts+. Available at: <https://gamedevelopment.tutsplus.com/tutorials/an-introduction-to-spritesheet-animation–gamedev-13099#:~:text=When%20you%20put%20many%20sprites,many%20images%20and%20display%20them.> [Accessed 8 December 2020].

Youtube.com. 2020. What Is Sub-Pixel Animation?. [online] Available at: <https://www.youtube.com/watch?v=Wqd6epIWo6E> [Accessed 8 December 2020].

Categories
Uncategorised

Mechanic Prototyping Project: Week 7 Production Diary

Development Activity

Since November the 2nd, I’ve continued working on my mechanic prototype and have made a good amount of progress. I would say that what I have so far right now is finished, and may only need to make some small improvements to further polish the project.

I think that having small improvements such as animated images may improve the feel of the game to be much more responsive and exciting to the player, although the mechanic is ready there is still more to add that can enhance it I feel.

One massive change I’ve made to the project was add in my own custom-made sprites, this includes; the player, enemy, bullet and background sprites. You can see this as evident in Figure 1.

Figure 1

As described by w3schools, this is made possible by the ‘getContext(“2d”)’ function.

To add images on a canvas, the getContext(“2d”) object has built-in image properties and methods.

w3schools.com

How this works is that when using the component constructor in our code, instead of referring to a colour for our player/enemy, we instead refer to the url of an image we want to display instead.

It is important to also tell the constructor that this component is an “image” type. As shown in Figure 2, I set images for the player, cursor and background.

Figure 2

This was a fairly simple process, however what was needed to make this work is that I needed to test if the component is of an “image” type by using the built-in “new Image()” object constructor.

I’ve also included another type called “background”, this is because I plan for a special behaviour for the background later.

To make sure the program is ready to draw the image, we use a drawImage method as oppose to the fillRect from before as shown in Figure 3.

Figure 3

As for making the background move, I’ve managed to set it so that it moves towards the left and sets its x coordinate back to 0 if it reaches a certain limit as shown in Figure 4.

Figure 4

What this does exactly is that it enables the background to scroll and loop, this creates the illusion that the player is constantly moving towards a direction.

I’ve also implemented a short animation of an explosion, which plays upon the impact of a bullet hitting an enemy ship.

This was slightly more complicated to do, as the multiple frames were in their own folder called “explode_sprite”. And thus extra steps are required for the program to get these images.

Before I fixed it, this error would come up in the code in Figure 5. This means that the program was unable to use our drawImage() function to draw our explosions sprites.

Figure 5

To access these images, I had to set the file path in the name as they were in a different folder to the html project in Figure 6.

Figure 6

To add on, the images are animated by using a integer variable that constantly adds up as well as setting up a timed variable that removes the sprites after the animation is finished.

The explosion sprites are numbered for this exact reason, the enemy’s image source is dependent on the image’s name with the end bit taken out, after this the current variable’s number is added onto the end of this.

This makes it so that each frame of the animation is played once the variable is increases. As seen in game, the sprites actually work and switch frames in Figure 7.

Figure 7

Now that I’ve managed to finish all the details, I think the game is done. I am quite proud of how far I managed to get with this, as it is one of my first projects using HTML and Javascript.

I’ve successfully fixed and improved many of the errors I’d encountered making this project, which were my aims before.

I also had some playtesters try out the game. In which they filled out a short questionnaire about how they felt the game played, this got a positive reception which I am also happy with as shown by the results on Figure 8.

Figure 8

One of my goals for the game was to make a game that controlled relatively simple and was easy for the player to pick up, many of the playtesters gave their thoughts and liked it as well as giving some suggestions to improve variety such as an optional keyboard control scheme.

Bibliography

W3schools.com. 2020. Game Tutorial. [online] Available at: <https://www.w3schools.com/graphics/game_images.asp> [Accessed 11 November 2020].

Categories
Uncategorised

Mechanic Prototyping Project: Week 6 Production Diary

Development Activity

Since October 26th, I’ve started work on my mechanic prototype. So far I’ve been using w3schools.com’s html tutorials to aid my progress, particularly the ‘game canvas’. This is an element that is displayed as a rectangular object on a web page, this is important because this particularly offers all the functionality you need for making games.

“The canvas element is perfect for making games in HTML. The canvas element offers all the functionality you need for making games.”

w3schools.com

As shown in Figure 1, I’m setting the canvas to my game. For my game, I’ve made the canvas longways.

Figure 1

This is because I plan for the game setting to be a side-scroller, as movement from the left and right is going to emphasized with the player constantly moving towards the right and the enemies will be facing to their left as shown by my plan on Figure 2.

Figure 2

To improve upon this, I’ve also doubled the size of the canvas alongside all its components. The reason for this was to improve the visibility for the game so that it didn’t look too small whilst playing it on the browser.

Figure 3 shows the comparison between the old and new sizes.

Figure 3

As shown on Figure 4, this was done very simply by going into the HTML code’s style, and adding in a width and height. This just simply changes how the game will be displayed on the browser and not the canvas or components themselves.

Figure 4

Alongside the canvas, I’ve also been working on implementing the player and enemy components of the game.

Although temporary, the player and enemies are represented as coloured squares; the player being red, enemies being blue. To implement the player, I added a function that adds a new component at the start of the game as represented by Figure 5.

Figure 5

The player will be controlled by the mouse only, this will be how the player is able to move and shoot. To implement this, we will have to add in an ‘addEventListener’ function attached to the mouse.

“The addEventListener method attaches an event handler to the specified element.”

w3schools.com

As shown on Figure 6, we have several of these functions; The first one which determines the cursor’s x and y position as it moves, the other being the even that triggers another function called ‘shooting’ when the player puts in a left click input.

Both of these will allow the player to move and shoot.

Figure 6

To add onto the movement, I’ve also added in some restrictions as to where the player can or can’t move.

I’ve made it so that the player’s position in the game area only updates if the cursor is within the canvas, this is so that the player isn’t able to move anywhere outside of the canvas.

This was done by using If and Else statements, essentially Figure 7 shows that if the cursor’s y axis is less or higher than the canvas height or 0, it will set the player’s y position to still be within the canvas. If any of these statements are not being met, then the else function sets the player’s y position to the cursor’s which should be when the cursor is inside the canvas.

Figure 7

This was implemented as to keep the player from cheating and avoiding the enemies moving towards them all together. It is also considered keeping the game neater and more robust.

To create the bullet projectiles and enemies, I’ve used arrays to contain the both of them.

“An array is a special variable, which can hold more than one value at a time.”

w3schools.com

Since I plan on multiple bullets and enemies appearing, an array would help to keep track of each individual one. In Figure 8, I made both of these variables identically.

Figure 8

Within Figure 9, I have enemies that appear during randomized intervals to keep the appearance of enemies less predictable. Once this interval is completed, it will then spawn an enemy within a randomized spawn range. This will be done when the new ‘myEnemy’ component gets pushed.

As the enemy spawns, I’ve used a for loop function so that they will be moving at a -8 pixels a second towards the left. If the enemy moves out of the canvas, then they will be spliced from the array (This means they will be removed), however if they’re still within the canvas they will be drawn.

This is done to keep the amount of variables low so that the code is able to keep running better, you could say that this is a way of optimization as well which may prove important for less powerful pcs.

Figure 9

As for the bullets, there is a similar function although without the needed randomization as they will be coming from the player’s X and Y position seen in Figure 10.

Figure 10

Although, despite the player being able to shoot bullets and enemies being able to constantly spawn, one issue that arises is that these bullets did nothing towards the enemies. Usually they’d fly past the enemy without registering any collision on figure 11.

Figure 11

As seen on Figure 12, to create the collision between both of these objects, I made a couple of for loops, both of these made sure whether the same bullet and enemy were within each other’s range. Once touched, both objects with splice each other out of their own arrays.

Figure 12

As for now, I’ve managed to get a working foundation for the mechanic which I consider to be a success.

My aims for now would be to try and polish the gameplay much more, as well as adding in some sprites with frame-based animations to make the game look much more appealing and nicer to play.

I feel as if the difficulties here would be trying to get all the sprites to work without it affecting the gameplay, this might mean that I might have to change some of the hitboxes depending on the shape of the player and enemies.

Playtesting will also be important, as this will let me know about what other people think of my game. Upon listening to constructive criticism I may have to modify some of this code, or even implement new features which may also be a challenge given the time we’ve got.

Bibliography

W3schools.com. 2020. Game Tutorial. [online] Available at: <https://www.w3schools.com/graphics/game_canvas.asp> [Accessed 5 November 2020].

W3schools.com. 2020. Javascript DOM Eventlistener. [online] Available at: https://www.w3schools.com/js/js_htmldom_eventlistener.asp [Accessed 5 November 2020].

W3schools.com. 2020. Javascript Arrays. [online] Available at: https://www.w3schools.com/js/js_arrays.asp [Accessed 5 November 2020].

Categories
Uncategorised

Developer Journal Task: Mechanic Prototyping Project Ideas

Mechanics in Games

The mechanics are essentially the rules and procedures of a game, in which they guide the player and how the game responds to the player’s moves or actions. These mechanics may often be taught to the player through gameplay, or explicitly stated through dialogue or text otherwise.

“Through the mechanics you create, you define how the game is going to work for the people who play it.”

Sharon Boller, 2013

You generally want these mechanics to be clear, and to enhance the experience of your game. It is with utmost importance that you think of the mechanics of your game before development via prototyping as they are a critical component of good game design, although they may not be perfect at first so you’ll have to test and tweak it as time goes.

Before starting development on a game, it is important to create a short prototype of your mechanic to make sure it works. You can also plan this out beforehand with flowcharts to understand how your code will work alongside it better.

Figure 1 (O’Reilly, 2020)

As shown in Figure 1, this is a simple flowchart representation of the game flow in ‘Rock, Paper and Scissors’. This shows how the mechanics of the game will work and how they’re connected, as well as what causes a win and lose condition.

My Project

For our project, we will have to identify a 2D web-based game mechanic and build a prototype that implements this specific mechanic making use of native HTML5, CSS3 and JavaScript.

Our prototypes in class will be tested by each other as well, we’ll be making use out of these test results to determine how our prototype performed and what necessary changes are needed to improve the usability and interaction of our mechanic.

What I’m set out to achieve is that I am interested in developing a simple arcade game alongside the likes of ‘Space Invaders’. Typically many of these arcade games from years ago had focused primarily on a single mechanic, which should be a reasonable goal to aim for.

“The basic mechanics of play for the Space Invaders genre are fairly simple: move your laser base left or right along the bottom of the screen and shoot the endless waves of aliens descending towards you.”

arcadeclub, 2020

As shown in Figure 2, the main goal of my prototype is to make a game that has simple controls and mechanics that the player will be able to pick up on the fly. I plan on doing this by just using the mouse to control the player.

Figure 2

The mechanics in my prototype will be quite simple, the player will be able to move a spaceship up and down using the mouse, this will simply follow only the Y coordinates of the mouse, whilst being at the same X coordinates – The player will also be able to shoot by using left click, this can be used against the enemies.

Enemies will only appear from the right of the screen at a random position and head towards the player, you will be able to avoid and both shoot these enemies with the movement and mechanics provided.

Depending on player feedback towards how the prototype performs, I intend for it to be relatively easy to understand but will add changes to the controls and difficulty if necessary.

Bibliography

Boller, S., 2013. Learning Game Design: Game Mechanics | Knowledge Guru. [online] Knowledge Guru. Available at: <http://www.theknowledgeguru.com/learning-game-design-mechanics/> [Accessed 28 October 2020].

O’Reilly Online Learning. 2020. Practical Game Design. [online] Available at: <https://www.oreilly.com/library/view/practical-game-design/9781787121799/b3322c72-3fbc-4407-be07-0abc2ca5070b.xhtml> [Accessed 28 October 2020].

Arcade Club. 2020. Space Invaders. [online] Available at: <https://www.arcadeclub.co.uk/games/space-invaders/> [Accessed 28 October 2020].

Categories
Uncategorised

Developer Journal Task: Ethics in Computer Games

Gambling in Games

There is a general concern about gambling within most modern video-games nowadays, typically found in many multiplayer-focused games there is a known feature called “Loot Boxes”. These are consumable items which may contain different cosmetics or items the player can use in-game.

“A loot box is a consumable virtual item which can be redeemed to receive a randomized selection of further virtual items, or loot.”

Wikipedia, 2020

However, the main issue resides in that many of these consumable items are purchasable with real currency and are also entirely focused on the player paying for the chance of getting anything of value – most of which is unlikely due to the huge selection of items being completely randomized.

There has also been many legal concerns surrounding this topic, particularly in the US the legal definition of gambling is as follows:

“A person engages in gambling if he stakes or risks something of value upon the outcome of a contest of chance or a future contingent event not under his control or influence, upon an agreement or understanding that he or someone else will receive something of value in the event of a certain outcome.”

USLegal.com, 2020

By definition, loot boxes within games that can be redeemed with currency to receive a random selection of items could very well be considered as a form of gambling in of itself.

Although, you could argue that if the loot boxes can be purchased through in-game currency instead then it is not exactly tied to real money (It may be possible to earn these entirely throughout gameplay as well).

Despite this though, you can still purchase these loot boxes through real money. Even if there is an alternative way to achieve these items without paying, it may be much more grindier and slower by intention to further incentivise the player to start spending real cash.

Personally, I feel that loot boxes shouldn’t be allowed within games as the system behind it has the same psychological impact as gambling. They are an intentional way to encourage players towards spending more on the game by feeding into bad habits associated with gambling.

“Whether or not we agree that loot boxes are gambling, the psychological mechanism behind both is nonetheless the same although the outcome is not: they are a form of intermittent rewards with a variable ratio reinforcement schedule (aka variable rewards).”

Ceila Hodent, 2019

To further prove my point that these loot boxes can have a negative effect on gamers, I’ve provided a study (See Figure 1) that shows the number of children with gambling problems and how it has heavily increased within the UK during 2018, in particular the prevalence of gambling amongst children has risen from 0.9% in 2017 towards 1.7%.

Figure 1 (GamblingCommission.gov.uk)

This certainly does raise some issues on the ethicality of loot boxes in games, as despite whether or not you pay real money for them they are still made to be addictive in mind. Many games geared towards the age groups of children and teenagers, specifically the more popular games nowadays being Overwatch or Fortnite which contain such features.

Bibliography

Celia Hodent. 2019. Ethics In The Videogame Industry: A Mythbusting And Scientific Approach – Celia Hodent. [online] Available at: https://celiahodent.com/ethics-in-the-videogame-industry/ [Accessed 21 October 2020].

En.wikipedia.org. 2020. Loot Box. [online] Available at: https://en.wikipedia.org/wiki/Loot_box [Accessed 21 October 2020].

US Legal, I., 2020. Gambling Law And Legal Definition | Uslegal, Inc.. [online] Definitions.uslegal.com. Available at: https://definitions.uslegal.com/g/gambling/ [Accessed 21 October 2020].

The Conversation. 2018. Gambling: ‘Loot Boxes’ In Video Games Could Be Conditioning Children. [online] Available at: https://theconversation.com/gambling-loot-boxes-in-video-games-could-be-conditioning-children-107667 [Accessed 21 October 2020].

Categories
Uncategorised

Developer Journal : The art of game design

Elements in Games

As described in the Art of game Design by Jesse Schell, there are four basic elements that form a game. As a games developer you must understand how to use each of these four elements; these elements consist of the game’s Mechanics, Story, Aesthetics and Technology.

First off, lets explain the mechanics. They are known as the procedures and rules of the game, your mechanics will dictate the role of your game – this’ll determine what players can or can’t achieve throughout gameplay. This is arguably the most important part of the elements, as mechanics are required to discern a game between other mediums of media as described.

“If you compare games to more linear entertainment experiences (books, movies, etc.), you will note that while linear experiences involve technology, story, and aesthetics, they do not involve mechanics for it is mechanics that make a game a game.”

Jesse Schell, The Art of Games Design (2008)

An example of how mechanics would be provided in a game could be how the player can take advantage of several power ups. The Mario Bros series has been known to introduce a wide variety of powerups that can change up gameplay as shown in Figure 1, these are able to give the player certain advantages such as extra firepower or agility. Although a typical mechanic, it can provide new and fun playstyles that the player can experiment with, this is a good mechanic as the different advantages each powerup provides will incentivize the player to try and find them throughout gameplay. I think that this gives the game a sense of variety, even though the gameplay is simple and easy to learn it provides a new edge for players to master.

Figure 1 (lifeofturner.blogspot, 2014)

The next element up would be the story, which is the sequence of events that unfold within your game. Some games tend to be mostly linear and pre-scripted, however others can be more branching and emergent. While telling a story you have to tell it through your game by making use of it’s mechanics.

“When you have a story you want to tell through your game, you have to choose mechanics that will both strengthen that story and let that story emerge.”

Jesse Schell, The Art of Games Design (2008)

An example of how a story can be provided within a game would be giving the player different options of dialogue to choose, this is typically found within RPG such as Deus Ex in Figure 2. As well as helping convey the game’s story, it will also help personalize the player’s character to fit who they want to be. This generally helps make the game feel more immersive and to give the player the feeling that their actions can have true weight to them.

Figure 2 (Zao R, 2013)

Another important element of a game would be its aesthetics, this is how the game is visualized to the player. It is considerably important as it has the most direct relationship to the player’s experience. Not only would this cover looks, but sounds and many other features as well, choosing the right aesthetics for your game can help reinforce the other elements of the game and make the players feel that they are in the world that the aesthetics have defined. I feel like this is one important way to present a story to the player, having direct interaction with the story makes it stand out from other media.

“When you have a certain look, or tone, that you want players to experience and become immersed in, you will need to choose a technology that will not only allow the aesthetics to come through, but amplify and reinforce them.”

Jesse Schell, The Art of Games Design (2008)

An example of how the aesthetics provided in a game can help enhance it would be the grimy comic book art style present in Madworld. Not only does the game look authentic to the style its based on, but many of the mechanics and actions tied to the game will also make use of the style. As shown in Figure 3, an action being performed by the player has text pop out as if it were an an action in a comic book – Not only does this make the game more true to the style but I also think it provides a much more immersive and unique experience.

Figure 3 (PlatinumGames.com, 2009)

Last of all would be the element of Technology. The technology of a game enables the possibilities of doing certain things and prohibits it from doing other things. This is the medium in which the story, aesthetics and mechanics take place. Typically, the technology of a game can be innovative, as described by Jesse Schell, the technology for space invaders was designed for the game.

“It was the first video game that allowed a player to fight an advancing army, and this was only possible due to the custom motherboard that was created for it. An entirely new set of gameplay mechanics was made possible with this technology. It was created solely for that purpose.”

Jesse Schell, The Art of Games Design (2008)

As a games developer, it is important to consider these elements. I personally like seeing games try out many different and unique mechanics, games stand out to me because of the interactions they provide unlike any other piece of media. I feel like it may be important to analyse many of these as it will be important to consider when developing games in the future.

Bibliography:

Lifeofturner.blogspot.com. 2014. Ranking The Mario Games: The Power-Ups. [online] Available at: http://lifeofturner.blogspot.com/2014/05/ranking-mario-games-power-ups.html [Accessed 14 October 2020].

Zao, R., 2013. Blog 572: Deus Ex. [online] Rao Dao Zao. Available at: https://raodaozao.net/2013/11/10/blog-572/ [Accessed 14 October 2020].

PlatinumGames Inc. Official WebSite. 2009. MADWORLD | Platinumgames Inc. Official Website. [online] Available at: https://www.platinumgames.com/games/madworld?age-verified=a77a7ff3b2 [Accessed 14 October 2020].

Categories
Uncategorised

Developer Journal Task: Sustainability Post

Sustainability through Games

The goal of sustainability on a product is to reduce the use of hazardous materials and to be more energy efficient. This can range from a multitude of products from phones to data centres. As billions of people rely on many electronic devices nowadays, it is important to consider the effects it can have on our environment – this term is often referred to as ‘Green Computing’.

“The goals of green computing are similar to green chemistry: reduce the use of hazardous materials, maximize energy efficiency during the product’s lifetime, the recyclability or biodegradability of defunct products and factory waste.”

(Wikipedia, 2020)

As gaming is a popular form of entertainment, developers have started making games with a stronger consideration for sustainability through interactive media. Google’s interactive game ‘YOUR PLAN, YOUR PLANET’ helps users to track their weekly waste at home as well as providing tips on saving money and conserving energy use.

(Maeve Campbell, 2019)

The game is split into four sections which help the user navigate different areas within their home – Each of these segments tie into typical daily household routines and asks the user questions on how they use up energy within these segments, afterwards they are then assessed on these results.

“Each informative segment is engaging, easy to understand but best of all – realistic. These are all tips we can incoporate into our daily household routines.”

(Maeve Campbell, 2019)

As this information is presented in a simple and concise manner, it may help to encourage its audience to try and become more eco-friendly. The game’s interactivity helps to gear it towards a younger audience as well as making it feel more engageable and fun.

Bibliography

En.wikipedia.org. 2020. Green Computing. [online] Available at: <https://en.wikipedia.org/wiki/Green_computing> [Accessed 29 September 2020].

Campbell, M., 2019. Google’S Interactive Game WILL Make You Live More Sustainably At Home | Living. [online] Euronews.com. Available at: <https://www.euronews.com/living/2019/04/30/google-interactive-game-your-plan-your-planet> [Accessed 29 September 2020].

Categories
Uncategorised

Jaydon’s Game Dev

Hi there! My name is Jaydon, this is my blog.

Who am I? I’m an aspiring developer who loves games. I usually often work solo on my projects, which means I am quite all-rounded in doing technical and artistic aspects.

As you can see, I have a lot of fun making games.

I’ve also got an Itch.io page where I post games, recently I contributed an entry to a two week game-jam. You can check this out here:

Categories
Uncategorised

Hello world!

Welcome to WordPress. This is your first post. Edit or delete it, then start writing!